
|
The county requires us to widen our road. That dooms this 70-odd year old white oak. Well, we might be able to use some of the wood if it doesn't have too much heart rot. I had it felled December 18, 2004, |

|
What a surprise! I sat down with a beer and counted to 118 rings in a beautiful, tight, even grain, with not a speck of rot. This old gentleman deserves much more respect, not to mention the great Glencarraig furniture it'll make. And I need to relook at quite a few other trees around the place that seemed about as old. |

|
Neighbor Roger moves the sections from the forest so we can set up to cut and dry them. |

|
After we secured the logs. I painted the ends to reduce checking. I have
decided to air dry this wood at the farm for the best grain clarity. Kiln drying, especially with steam, muddys the grain and drains color form the wood. And, now we wait for the appointment with the sawyer. |

|
This talented sawyer team is a whizz at handling the log sections. |

|
....And cutting them into boards. |

|
And now after one of our late winter snows in early March '05, a few days after the sawyer left, this beautiful oak sleeps while it dries for a year or two. The end of this tale will show the first piece we build with it.
|

|
After a more than a year in the yard, we brought in about half the boards to finish drying inside. This is the half that's left. It contains the 8/4 boards that need another year outside.
|

|
It takes a few weeks to get down from the 12% that is the best we can do outdoors, to the 5 - 7% moisture we like to work with. (it was 27% when fresh cut) Now at 6% it looks like this before we clean it up and dimension it.
|

|
Here is the first surface of the first board cleaned with a few passes on the jointer to show the tight straight grain we first saw counting rings in the stump. We see it as it will look in one of our Glencarraig cases. This first one is a "Jelly Cabinet" for my pal Sam. |

|
I construct furniture using post, frame, and panel. To me, it is the most visually pleasing as well as the strongest, and as light as lasting furniture can be. It is also the way that is, in useful furniture, closest to a natural trunk and branch form. So I start a case with the posts that support the peice and a photo like this one to begin to visualize the piece in 3 dimensions. These posts are from quarter-sawn stock to highlight them. You will notice the difference as we go along, but it really pops after finishing. |

|
After a bit more work we have the basic frame and a back. It looks pretty fair from this side.
|

|
Now the floor and the support for the two draweres on top are in, along with the side panels and the shelves that will be behind the doors. |

|
I color the panels before assembly so seasonal changes won't reveal bare wood. The color is about what the finished cabinet will look like. |

|
Here is how we glue up narrower boards for the the door panels, shelves, and tops. Its true. You can never have too many clamps. The scraps of waxed paper keep the glue from sticking to the clamps.
|

|
The parts of the right hand door assembled to check for last minute adjustments. This one is ready for glue. |

|
These doors are to fit flush with the frame. After they are rough trimmed to size I do the first test fit to see where to begin trimming. The process is a wodworkers equivalent of juggling a bowling ball, a q-tip, a cat and a knife. I have heard that doors have been known to be scrapped and rebuilt at this stage, so don't talk to me for a few days. Maybe quite a few.
|

|
OK, we have the doors fitted so we can set them aside for now and work on the drawers. They are easier than doors, no cat, just the bowling ball, q-tip and knife. I fit the drawer fronts to the opening first, then build the drawer body to the front. |

|
Some glue and brads will keep the drawer stops solid. On the left we show how we notch the drawer back to allow it to pass over the stop for its removal. The groove (dado) near the bottom edge receives the drawer bottom. |

|
With all the finishing done and the doors reattached, the last job is to attach the catches. I use a steel screw as a catch, that way I can just pop the screw on the magnet and bump the door against it for easy as pie accurate placement. |

|
This detail shows the prominent ray structure in the quarter sawn post that is the distinctive mark of white oak. |

|
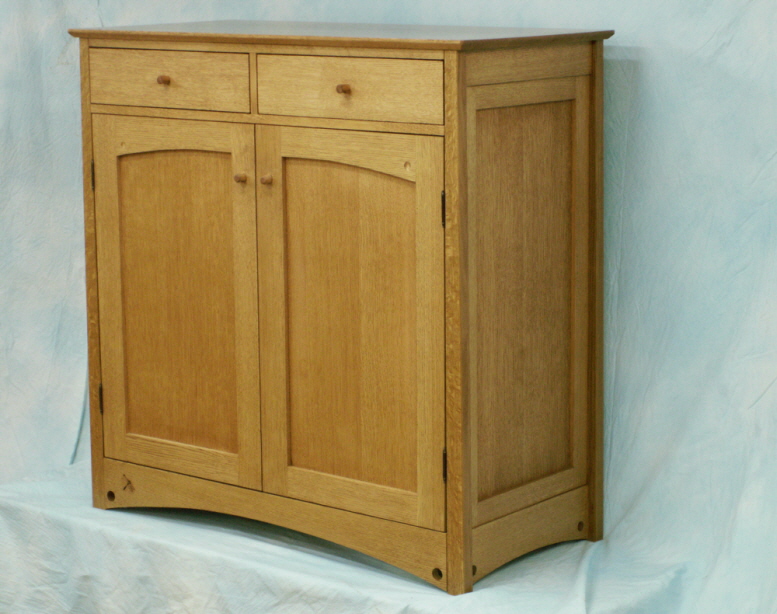
The finished Jelly Cabinet. |
|
One more shot to take to complete this tale. Thats the one from Sam's dining room. |

|
Its December of '06 and..... Two years after coming down from the tree on the hill overlooking Glencarraig Farm, this beautiful oak lives again now as the jelly cabinet in Sam's dining room. |
| Back |